Blog
Fortigate In Azure Configuration: Best Practices
Elias Christoforou - Senior System consultant
In today's cloud world, safeguarding your digital assets is paramount. As organizations migrate their infrastructure to the cloud and as gold members of Microsoft in Cyprus, Microsoft Azure emerges as a prominent choice. To bolster Azure security, Fortinet, a renowned cybersecurity company, offers a powerful solution through the integration of FortiGate with Microsoft Azure. In this article, we will delve into the advantages of using FortiGate in Azure, best practices for secure Azure infrastructure, and additional security options like FortiToken. We'll provide technical details and screenshots to guide you through the setup.
Advantages of Azure FortiGate Integration
Unified Threat Management (UTM): FortiGate is a UTM solution that combines multiple security features into a single platform, including firewall, intrusion prevention, antivirus, web filtering, and more. By integrating FortiGate with Azure, you gain comprehensive protection for your cloud resources.
Seamless Integration: FortiGate seamlessly integrates with Microsoft Azure, ensuring that your security policies extend into the cloud environment without disruption.
High Performance: FortiGate appliances are known for their high performance and throughput, ensuring minimal impact on network performance while maintaining stringent security.
Best Practices for Secure Azure Infrastructure with FortiGate
Planning and Network Segmentation:
- Begin by carefully planning your network architecture, including Azure Virtual Networks (VNets) and subnets.
- Segment your network to isolate critical resources and apply different security policies where needed
Deployment of FortiGate in Azure:
- Deploy FortiGate virtual appliances from the Azure Marketplace to your desired VNets.
- Ensure high availability by deploying at least two FortiGate instances in an active-passive or active-active configuration.
Security Groups and Network Security Groups (NSGs):
- Configure NSGs to control inbound and outbound traffic to FortiGate instances.
- Restrict access to essential ports and protocols, allowing only necessary traffic
Routing and Route Tables:
- Implement Azure Route Tables to direct traffic through FortiGate instances, ensuring inspection and security enforcement for all traffic.
Regular Firmware Updates:
- Keep your FortiGate firmware up to date with the latest security patches and updates.
Logging and Monitoring:
- Configure logging to Azure Monitor or a SIEM solution for real-time security event monitoring. Set up alerts to detect and respond to suspicious activity.
User Identity and Access Control:
- Integrate FortiGate with Azure Active Directory for identity-based access control.
- Enforce user-based policies for enhanced security.
Additional Security Options
- FortiToken: Implement multi-factor authentication (MFA) using FortiToken to add an extra layer of security for remote access to FortiGate and Azure resources.
Technical Details and Screenshots
A. Deploy the FortiGate VM
- Go to the Azure portal, and sign in to the subscription into which you will deploy the FortiGate virtual machine.
- Create a new resource group or open the resource group into which you will deploy the FortiGate virtual machine.
- Select Add. In Search the Marketplace, enter Forti. Select Fortinet FortiGate Next-Generation Firewall.
- Select the software plan (bring-your-own-license if you have a license or pay-as-you-go if not). Select Create.
- Populate the VM configuration.
- Set Authentication type to Password and provide administrative credentials for the VM.
- Select Review + Create > Create.
- Wait for the VM deployment to complete.
B. Set a Static Public IP address and Assign a Fully Qualified Domain Name
For a consistent user experience, set the public IP address assigned to the FortiGate VM to be statically assigned. In addition, map it to a fully qualified domain name (FQDN).
- Go to the Azure portal and open the settings for the FortiGate VM.
- On the Overview screen, select the public IP address.
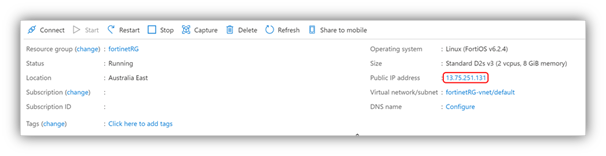 |
3. Select Static > Save.
If you own a publicly routable domain name for the environment into which the FortiGate VM is being deployed, create a Host (A) record for the VM. This record maps to the preceding public IP address that is statically assigned.
C. Create a New Inbound Network Security Group Rule for TCP Port 8443
- Go to the Azure portal and open the settings for the FortiGate VM.
- In the menu on the left, select Networking. The network interface is listed, and the inbound port rules are shown.
- Select Add inbound port rule. Create a new inbound port rule for TCP 8443 and select Add.
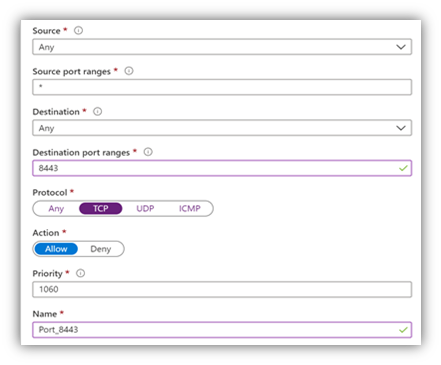 |
D. Create a Second Virtual NIC for the VM
For internal resources to be made available to users, a second Virtual NIC must be added to the FortiGate VM. The Virtual Network in Azure on which the Virtual NIC resides must have a routable connection to those internal resources.
- Go to the Azure portal and open the settings for the FortiGate VM.
- If the FortiGate VM is not already stopped, select Stop and wait for the VM to shut down.
- In the menu on the left, select Networking. Select Attach network interface.
- Select Create and attach network interface.
- Configure properties for the new network interface and then select Create. Start the FortiGate VM.
E. Configure the FortiGate VM - Change the Management Port to TCP 8443
- Go to https://<address>. Here, <address> is the FQDN or the public IP address assigned to the FortiGate VM. Continue past any certificate errors.
- Sign in by using the administrator credentials provided during the FortiGate VM deployment.
- In the left menu, select System.
- Under Administration Settings, change the HTTPS port to 8443, and select Apply.
- After the change applies, the browser attempts to reload the administration page, but it fails. From now on, the administration page address is https://<address>:8443.
F. Ensure Network Interfaces are Obtaining IP Addresses
- Go to https://<address>:8443. Here, <address> is the FQDN or the public IP address assigned to the FortiGate VM.
- Sign in by using the administrator credentials provided during the FortiGate VM deployment.
- In the menu on the left, select Networking. Under Network, select Interfaces
 |
4. Examine port1 (external interface) and port2 (internal interface) to ensure they are obtaining an IP address from the correct Azure subnet. a. If either port is not obtaining an IP address from the subnet (via DHCP), right-click the port and select Edit. b. Next to Addressing Mode, ensure that DHCP is selected. c. Select OK.
G. Ensure FortiGate VM has Correct Route to On-Premises Corporate Resources
Multi-homed Azure VMs have all network interfaces on the same virtual network (but perhaps separate subnets). This often means that both network interfaces have a connection to the on-premises corporate resources being published via FortiGate. For this reason, it is necessary to create custom route entries that ensure traffic exits from the correct interface when requests for on-premises corporate resources are made.
- Go to https://<address>:8443. Here, <address> is the FQDN or the public IP address assigned to the FortiGate VM.
- Sign-in using the administrator credentials provided during the FortiGate VM deployment.
- In the menu on the left, select Networking. Under Network, select Static Routes.
- Select Create New. Next to Destination select Subnet.
- Under Subnet, specify the subnet information where the on-premises corporate resources reside (e.g., 10.1.0.0/255.255.255.0)
- Next to Gateway Address specify the gateway on the Azure subnet where port2 is connected (e.g., this usually ends in 1 like 10.6.1.1)
- Next to Interface select the internal network interface, port2. Select OK.
 |
Conclusion
Azure FortiGate integration offers a robust solution for securing your Microsoft Azure infrastructure. By following best practices, you can ensure a secure and performant cloud environment. Additionally, consider implementing advanced security options like FortiToken for enhanced protection. Remember, cybersecurity is an ongoing effort, so stay vigilant, keep your systems up to date, and monitor for any threats to maintain a strong defence against evolving cyber threats in the Azure cloud.
 |
Elias Christoforou having the title of Senior System consultant working at IBSCY LTD, one of the biggest consultant and implementation companies in the field of Information technology, working on different Implementation projects and support tickets for our clients, can provide any arising IT issues and resolve the functionality of existing systems. |
